
Inclinations; rotations; transtations; tugof-war; hand exercises; illusory walks #1 and #2; walks with a high knee; takes; improvisation with sneak and take.
Do the inclinations, rotations, chest impulses, and transtations. Practice the tug-of-war and the hand exercises. Do the first illusory walk as we practiced it in Lesson Four.
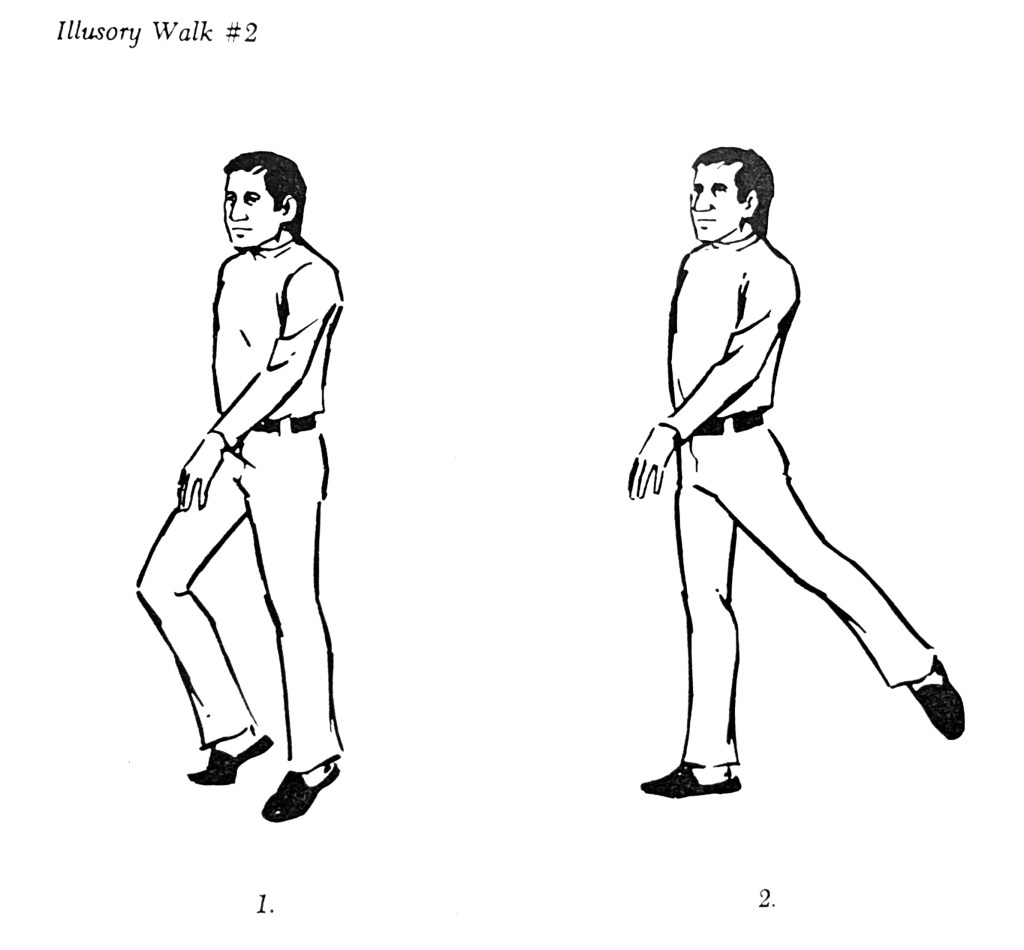
Illusory Walk #2:
This is another walk in place that looks like you’re actually covering ground while you remain in place. It works on a different principle from the first illusory walk; the arms are easier with this one, but the legs are more difficult. Starting position: place your right foot on its half-toe, with the raised heel pointing towards your left ankle, and place your left arm forward, so that it is in opposition to the bent right knee. Your right foot should be close enough to the left one so that if you lower the heel it will almost touch the left instep. There are 2 halfs to practice in this walk: Lean your weight onto the right half-toe; as you press the right heel to the floor, lift the left leg (with the knee remaining straight) to the rear, so that it is about 12 inches off the floor. The right knee should become straight as the right heel touches the floor. The arms do not move at all. Stop. Then pull the left leg back into its former position on the floor as you bend the right knee, and rock back up onto the half-toe of the right foot. You are now in the starting position again. Keep doing this over and over, without moving the arms. Try it on the other side many times. Now, all you need is the change between. From the beginning: You are on the half-toe of the right, with the right knee bent, and the heel towards the left instep; shift the weight onto the right half-toe, then press the right heel down, lifting the left leg to the rear. Be sure at this point that both knees are straight. Now change the leg and arms: Place the left foot on its half-toe, near the right foot, with the left knee bent, and the heel pointing towards the right instep. Change the arms with the change of legs, so that the right arm is now forward. Shift the weight onto the left half-toe, press the left heel down, lifting the right leg behind you. Both knees are now straight, left heel on the floor. Change the leg and arms, shift the weight, and continue. It is important to straighten the knee of the leg whose heel is pressing toward the floor, and it is most important not to change the arms except while the leg is changing. The shoulders may change with the arms, to give a twist to the body, but the body from the pelvis down should remain straight flat forward, without rotating at all, and without the knees turning in. The legs should be turned out for this walk. This walk is the basis of the illusion of walking against the wind (practice it until it is smooth, and then imagine a gust of wind blowing at you, and let the body adjust) and of ice-skating.
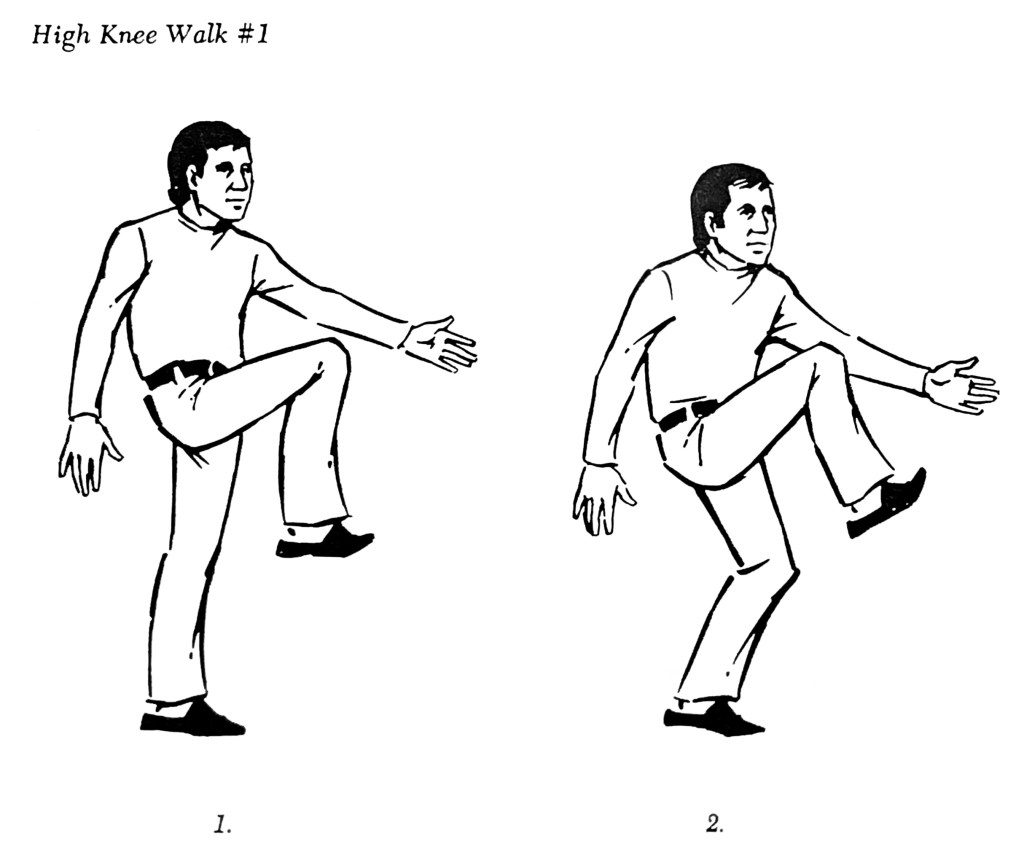
Walk with a High Knee:
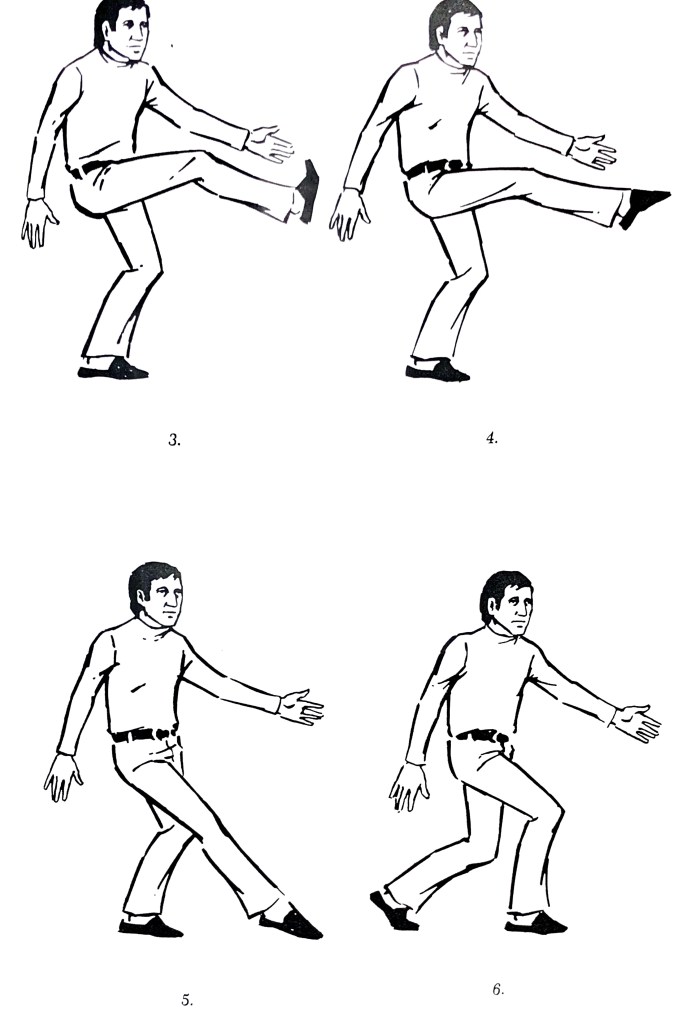
There are four walks with a high knee, but we will only do one now. These are sneaky walks, and are classic in form. Stand straight: 1. Lift the right knee as high as you can, foot flexed, and put the left arm forward, and the right arm back. The left knee remains straight; the balance should be vertical, and the right heel should be pulled as far back and in as it can, with the knee pulling up. 2. Bend the left knee, lifting the right knee higher, and keeping the foot flexed with the heel in. The body should remain vertical; don’t lean back, and keep the left arm forward. 3. Extend the right leg and foot forward, keeping the foot flexed, and reach a bit further forward with the left hand. Don’t move anything else. 4. When the right leg is extended as far as it will go, even if the knee is not straight, point the right toe. 5. Continue the pointing motion, and bring the foot down until it touches the floor. The left knee is still bent, and the weight is still on the left foot, with the left arm reaching forward. 6. Shift the weight forward onto the right foot, sliding through, allowing the right knee to bend, but keeping the left arm reaching forward, until all the weight is on the right. Then change: Lift the left foot up off the floor, knee high, straighten up, straighten the right leg, left heel in and foot flexed, and right arm forward. You are now in position #1, again on the other side. Be sure you regain your balance on #1, and are really up straight. Do the walk from this side, and continue. It takes a while to become smooth, and it generally stays slow. Each move can flow into the next one, but be sure you complete each one.
Takes:
A take is a look. They are a comedic and/or dramatic device that should be practiced physically, but won’t work unless they are motivated in perform. ance. The denomination of the take tells you the number of turns of the head -a double take is two turns, triple take is three turns, etc. There must always be an emotional reaction on a take. There are two ways to do the single or simple take: you are walking, and something catches your attention out of the corner of your eye; you stop, turning your head at the same time towards what you see. The second way is to stop first, wait a moment, and then snap your head towards the event or object. There is only one turn of the head. For the double take, there is a prelude, and then it is the same. You are walking along, your head drifts around to the side, and drifts back as you keep going; sud. denly you stop and snap your head around because something has registered. The first turn of the head must have no reaction: It is nonchalant. The reaction takes place after you’ve brought your head back. The second way to do the double take is like the second single take: You walk, your head drifts around, it drifts back, you walk on, suddenly you stop, wait, and then snap your head towards what you have seen. One way is to stop and turn at the same time; the other way is to stop, wait, and then turn. The triple take, or quadruple or more are the same, except that each time you turn the head your reaction must be bigger. You can go on until you cannot get a bigger expression and reaction. The slow take is the same, except that for the last turn of the head, you do it very slowly, as if you cannot believe what you have seen. You should practice takes both to the right and to the left, moving and in place, big and small. If there is time, do an improvisation which starts by sneaking on, and which has a take in it. Look at the homework assignment.
Homework Assignment:
Diminution of the action. Bring in a short exercise within which an object is handled, using slow and clear chest impulses for all the arm movements. Do it very slowly, with exaggerated chest impulses. Then do the same exercise again, this time smoothing out the action, rounding the corners, and giving only a suggestion of the chest impulses. Do it this time at a normal speed. If you practice the slow version enough times, the faster version is easy.
