Discussion of basic principles of mime; the double-zero position; diaphragmatic breathing; inclinations; rotations; transtations; transtation improvisations; facial exercises; imaginary objects; walk #1.
This first class can start with a discussion of some of the general principles mentioned in Chapter One: the universal gesture idea, magnification, separa. tion, winding up, the conventions, etc. The Double-Zero Position: We start all mime exercises from what we call the double-zero position. It is: Stand erect, heels together, feet at a ninety degree angle, tuck your pelvis under (as if two pins were coming at you, one aimed at your waist in front, and the other aimed at your lower buttocks in back), lift your chest without pulling your shoulders back, and get your head level (as if a string were pulling the back of your head upwards). The arms and neck should be relaxed, the knees straight. It is a stylization of a normal standing position.
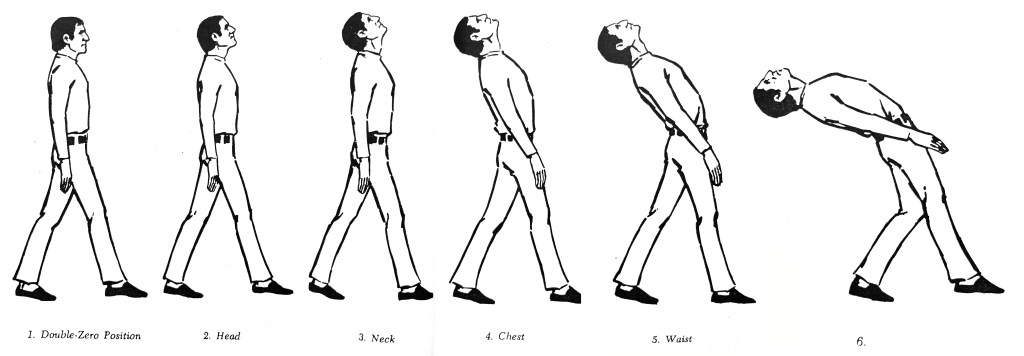
Diaphragmatic Breathing: Mimes, actors, singers, and dancers should breathe from the diaphragm while performing. For the singer it gives breath support; for the mime, it enables him to keep his chest lifted when he wants to. There are many characters, such as Frank Butler in Annie Get Your Gun, who must maintain a lifted chest for the two and a half hours of a show. The only way this is possible is to breathe from the diaphragm, without the chest rising and falling at each breath. The diaphragm is just below the bottom ribs; it should be thought of as a kind of balloon: When you breathe in it inflates, when you breathe out it deflates. The chest stays lifted, and just the area around the diaphragm moves while breathing. Practice this until you can do it easily. Since the chest must be lifted for the double-zero position, it includes breathing from the diaphragm. Breathing must always be silent, no matter how strenuous the performance practice keeping a clear air passage while panting. The inclination and rotation exercises are the basis of the technique, and are the ones that separate the body into the five pieces: head, neck, chest, waist, and pelvis. They are done in several directions. The Forward Inclination: Stand in the double-zero position, and lower the chin, tilting the head forward as far as it will go without moving the neck. The neck is still perpendicular. Stop. Then incline the neck forward, keeping what you already have with the head. Relax the back of the neck, and let it go as far forward as possible. Stop. Next tilt the chest forward, breaking at the bottom rib, and without collapsing the chest or bringing the shoulders forward. The shoulders maintain their relationship with the chest, and the waist is still vertical, with the pelvis still tucked under. The head and neck are still continuing forward, and should not relax yet. Sto. Next incline the waist forward as far as it will go, keeping the pelvis tucked under. Do not lose any of the other forward inclinations that you have already achieved. Stop. Now relax the pelvis, and tilt it as far forward as it will go. Be sure you don’t relax the other inclinations. You should now be rolled forward as far as the body will go, with the knees straight and the weight on the toes. Stop. Now come up one piece at a time: First the pelvis straightens by tucking under tightly, then the waist lifts until it is vertical, and then the chest lifts all the way up with the shoulders down, then the neck lifts, and finally the head straightens, and you are back in the double-zero position. Do this sequence slowly and carefully three times.

| 1. Double-Zero position | 2. Head | 3. Neck | 4. Chest | 5. Waist | 6. Pelvis |
The Rear Inclination:
Step forward onto the left foot, and settle the weight evenly between both feet, with the left heel about a foot or a foot and a half in front of the right toe. Do not turn out either foot, and keep the pelvis pointed flat forward. Lift the chin, inclining the head toward the rear, and keeping the neck vertical. Stop. Incline the chest to the rear, breaking at the bottom rib in the back. This is a small move, and should catch in the small of the back. The head and neck continue back. Next tilt the waist back until you feel it catch at the waist, and finally, for the inclination of the pelvis to the rear, just bend the back knee as far as you can, without bending the front knee, and keep the rest of what you have achieved. Stop. Be sure you don’t sink in and collapse the chest when you do the pelvis. Keep the inclinations you have achieved. Then come back up, one piece at a time: First straighten the knee, bringing the pelvis up, then the waist, then the chest, then lift the neck, which should bring the head into its first lifted position, and then lower the chin, and you are vertical again. Do this slowly and carefully on each side: first with the left leg in front, and then with the right.
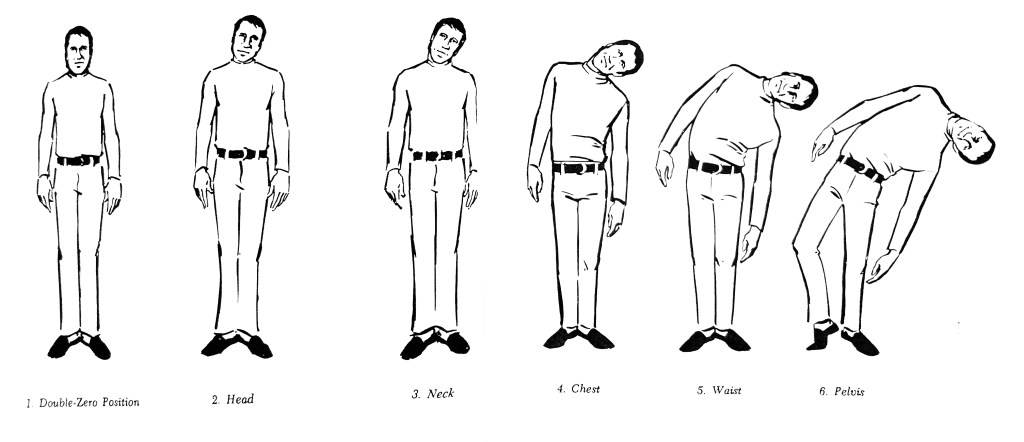
The Side Inclinations:
As a preparation for this, place the palms together as the head with the elbows open. Now reach the bottom of the right ear towards the right elbow; then reach the bottom of the left ear up towards the left elbow. This starts the muscles in the neck exercising so that the head can move back and forth like a Hindu dancer’s. Practice this in front of a mirror every day for a few minutes, and you will soon be able to do it easily. After the preparation, tilt the head toward the left shoulder as far as it will go, with the neck remaining vertical. Stop. Now tilt the neck in the same direction until you feel it would tilt the shoulder to go any more. Stop. Be sure your face remains facing straight forward, and not looking down at the floor. Next tilt the chest to the left, breaking at the bottom rib, with the waist and pelvis remaining vertical, and the head and neck continuing on down. Don’t collapse the chestkeep it lifted as you incline it. Stop. Now incline the waist to the left as far as it will go without moving the pelvis, and finally, incline the pelvis to the left by bending the right knee, and going onto the half toe of the right foot as you tilt over as far as possible to the left, pushing the left hip in. Stop. Then come up one piece at a time: pelvis, stop, waist, stop, chest, stop, neck, stop, head. Now do it to the right. Practice this slowly and carefully two or three times to each side.
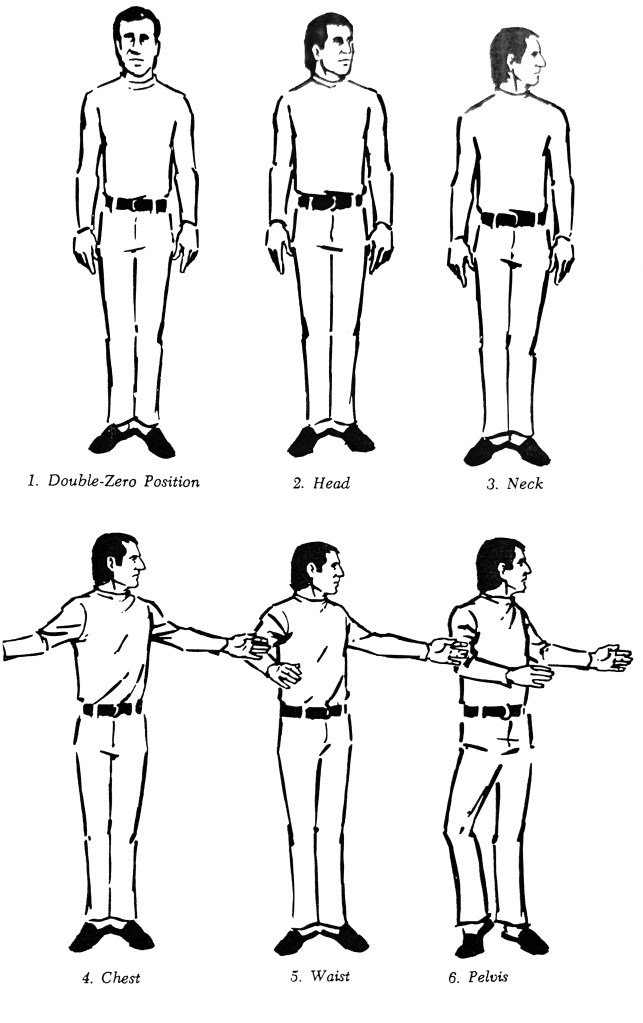
The Rotations:
As a preparation for this, extend the arms out to each side as if you were hugging a giant barrel, keeping your hands below shoulder level Now let your arms drift up and down with the palms down, as if you were standing in water, and as if the water were offering resistance, so that your hands trail behind your arms: you break at the wrist, and your hands droop up as your arms come down, and the hands droop down as the arms drift up From now on, whenever you put your arms and hands down, let the hands trail a bit. Once again, start in the double-zero position, and turn the head to the left, keeping it vertical, until the big muscle on the right side of the neck starts to pull. Stop. Rotate the neck to the left as far as it will go, and keep the head turning. The head must be kept level. The head will usually be level when it feels like it is leaning toward the front of the room. Stop. Now turn the chest to the left, with the head still leading, pulling to the left. The instant the chest hits its final position in its turn, at the point where the waist would turn, stop the movement of the chest and allow its impact impulse to knock the arms into the air into an open position, as if the big barrel you were hugging is now a bit off to the left. Extend the hands as if you were reaching to shake hands. Stop. Twist the waist around to the left as far as it will go without turning the pelvis, and without changing the relationship between the arms and the chest. Stop. Now, to turn the pelvis, rotate it, and bend the right knee, go onto the half toe of the right foot, keeping the heel over the spot that it leaves. Keep the left hip in, and the entire body straight, level and vertical. Pull up higher, and be sure the head is still level. Now come back one piece at a time. Turn the pelvis back, straighten the knees and tuck the pelvis under try to lock it into position so that it doesn’t move; bring the, then rotate the ches ent with the waist and pelvis, and when it is in position let the arms fall to the sides (with the hands trailing), then rotate the neck back and then the head. You should be back in the double-zero position. Try it to the other side, and then repeat each side.
The Transtations:
Next in importance are the transtations, which are the basis for certain characterizations and for one of the illusions. “Trans" means “across," and the transtations are movements parallel with the ground. Push the head forward, level with the ground, using the neck as an intermediary and keeping the chest still. Now bring it back to the center. Now pull it to the rear, still level, as far as it will go. Now back to the center. Repeat this several times. The chin must not raise or lower on these, but must remain parallel to the floor. Now do it side to side, as we practiced when preparing for the side inclination Now the chest: Thrust the chest forward without pulling the shoulders back, so that the chest is in front of the pelvis. Now bring it back to the center. The waist is an intermediary here, and the pelvis remains still. Now sink the chest back behind the pelvis without pushing the shoulders forward. In both of these the arms just hang because they are attached to the chest. Now bring the chest back to the center. Repeat this several times. Now side to side: Keeping the pelvis tightly tucked under and the chest lifted, slide your shoulders across parallel to the ground with the waist as an intermediary, then back to the center, then across to the other side. Do it several times.
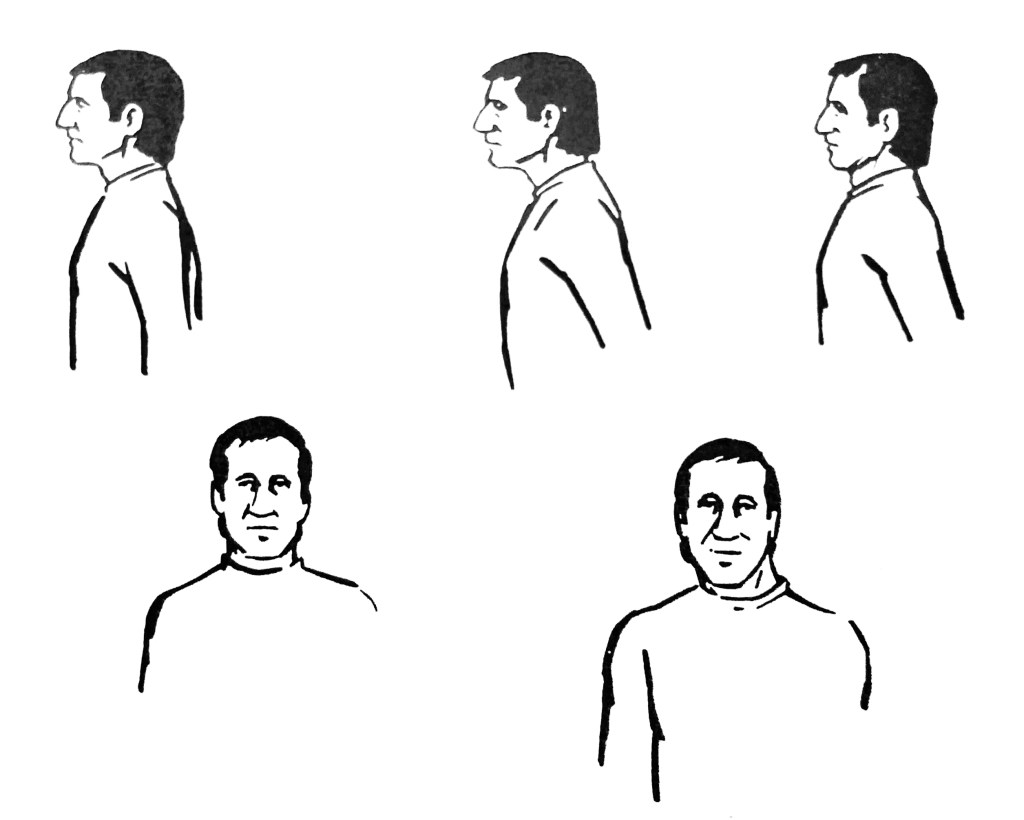

Now let’s combine a couple of these and see what kind of characters they make: Transtation the head forward; keep this, and transtation the chest forward. Now walk around: Get the feel of this character, and make up a walk that goes with him. Transtation the head to the rear, and the chest to the rear, and make up a walk for this character. Now try the head transtationed forward and the chest to the rear, and see how this character walks; and finally, transta. tion the head to the rear and the chest forward, and find a walk for this one. With all of these positions keep the head parallel to the floor, and be sure the chest is level.
Transtation Improvisations:
Have two people face each other ten to twenty feet apart. Let one of them transtation his head forward and his chest to the rear, and the other transtation his head to the rear and his chest forward. Let each get the feel of his character, and then have them walk to the center and meet, and interact. They must keep the physical posture, and base their attitude on it. When they have finished, and walked off, let them switch positions (and characters) and try it again. Everyone in the class should get a chance at this.
Facial Exercises:
These are the only exercises that are best done at the mirror. Their purpose is only to stretch and make flexible the muscles in the face, not to practice any set expressions that should be used. There is no set way to display any emotion, but a mobile face will project what you are really feeling more clearly and strongly than an inflexible one. First, raise the eyebrows as high as you can, and then lower them as low as possible. Keep going up and down, letting the movement get faster. Next open the mouth as wide as possible, then close it, then open it as long as possible, then close it, and keep alternating wide and long. Then rotate your closed lips around and around in a chewing motion, and do it in the other direction. Now open the eyes as wide as possible and look up, then down, then alternate several times. Then look to the right, to the left, and alternate. Look to the right, fix on a point, turn your head to it. Look back to your own eyes in the mirror, then bring the head back. Do this to the other side.
Now for expressions:
Open the mouth long, lift the eyebrows, and open the eyes wide. We can call this “surprise," although you wouldn’t use it to show surprise, because it’s too exaggerated. Now put the bottom teeth in front of the top teeth, protruding the jaw, pull the corners of the mouth down, pull the eyebrows down, and we can call this “mad." Next pull the corners of the mouth down by dropping the jaw with the lips closed, and lift the eyebrows a bit and squint around the eyes, and think “sad." Now smile broadly, a big idiotic grin, and lift the eyebrows high and open the eyes wide, and we’ll call it “happy." Try snapping your head to the mirror and landing in any of these four expres. sions, then snapping away from the mirror and losing the expression.
Imaginary Objects:
Imaginary objects have to be handled as if they were real. Pick up an imaginary glass; be sure that the hand is open wider than the glass and then closes onto the glass. Lift it; keep the tension in the hand and arm that would be needed to carry a real glass. If you relax your hand it will start to close, and seem to be crushing your imaginary glass. When you put it down, be sure you let go of it: Place it down, and relax your hand open to release it, and then move your hand away from it. Do these actions separately to make them clear. If you take your hand away from the glass before you let go of it, it looks as though you have taken the glass with you. Try opening a kitchen cabinet: Be sure the knob has some thickness, and that your fingers close onto it. Be sure the knob retains its level above the floor as it opens the door. Be sure you let go of it before taking your hand away from it. Then close it. Practice. Have each member of the class practice handling an object, and then have them perform their object for the class.
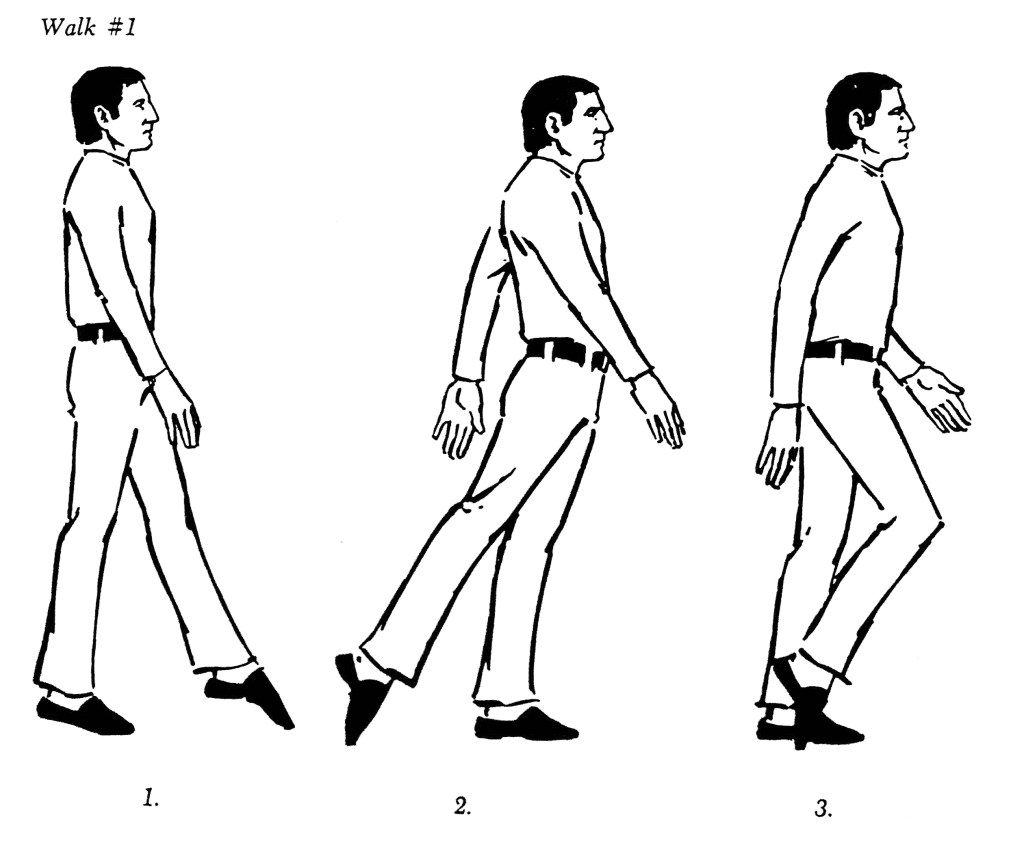
Walk #1:
This is a stylization of a normal walk as you walk down the street. In a normal walk there are two processes that take place: first there is a shift of weight, and then there is a change of the leg and arms. We will separate these two moves as we do our version. Stand with the right foot pointed forward with all the weight on the back foot; the left arm forward, the right arm back. There is no weight at all on the front foot: The toe barely touches the floor.
Move 1:
Shift all the weight onto the front foot. Don’t change the arms at all, and be sure that all the weight is now forward.
Move 2:
Change the leg and the arms—that is, now point the left leg forward, without putting any weight on it, and at the same time put the right arm forward and the left arm back. That’s it. Those are the two moves of the walk.
Now continue it:
Shift the weight forward (be sure the arms don’t change as you shift) then change the leg and arms (be sure no weight goes to the front foot on the change). On the change, turn the toe over, bring the arms in close to the body, the knee in close, and keep the toe on the floor. Continue across the floor, and try it a few times back and forth.
Homework Assignment:
Practice handling an imaginary object, and bring it in to show at the next lesson.